Burn Bootloader And Program Atmega16/32 With Arduino Ide
Di: Ava
This article will give you all the necessary information about the Bootloader in the Arduino AVR board. After this article, you will learn about what Bootloader is and what the burn bootloader does in Arduino IDE. As an ISP programmer, how does Arduino Uno upload Bootloader in Arduino Uno and Arduino Mega board? Cara Menggunakan ATmega 32 dengan Premrograman Arduino IDE Giri Wahyu Pambudi Mei 18, 2017 Pemrograman 2 Comments 15,558 Views Assalamualaikum Warrahmatullahi Wabarakatuh, kalian lagi cari cara burning Bootloader Arduino ke Atmega 32? atau kalaian lagi cari Cara Menggunakan ATmega 32 dengan Arduino ?? pas sekali jika kalian The bootloader is a small piece of software that allows uploading of sketches onto the Arduino board. It comes preprogrammed on the microcontrollers on Arduino boards.
Now its all ready full support for atmega32 has been added to arduino ide and now one can program the atmega32 microcontroller with arduino ide. Note: Their are some limitations you can not program the atmega32 like you program the arduino. Since their is no boot loader written for atmega32. So we need an external programmer to Remember not to use Atmega8L with this boards.txt settings. Burning the Bootloader If you have a new ATmega8, you’ll need to burn the bootloader onto it. You can do this using an Arduino board as an in-system program (ISP). To burn the bootloader, follow these steps: Upload the ArduinoISP sketch onto your Arduino board. (You’ll need to select the board and serial port
Atmega32A not burning bootloader
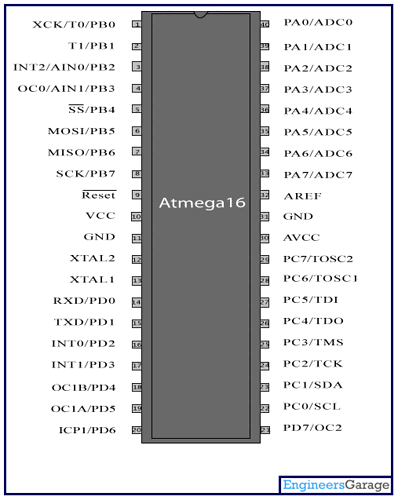
Burn Bootloader and Program ATmega16/32 with Arduino IDE using FTDI Programmer like Arduino Uno! https://lnkd.in/dMcntQNY Hi! For the few last months I’ve been maintaining the MightyCore. It’s an Arduino core for the ATmega8535, ATmega16, ATmega32, ATmega164, ATmega324, ATmega644 and ATmega1284 (and all their P, PA, A, L variants). They come in DIP and TQFP packages. I’m able to squash a few bugs here and there, but I sure need your help in order to make this a bug free
Hello, I am working a a small project. I am hoping to upload code to the Atmega32A using a USBasp programmer. Now, my problem is when I try to burn the bootloader. Previously, I have gotten the avrdude: verification error; content mismatch. I have done some reasearch, and found that burning the bootloader is the best option. Now I am greeted with this Then maybe I just might be able to use AVRDUDE to read and write fuses and lock bits properly. To recover and make the chip writable again in the case I activate flash memory protection, I think I can recover by burning the bootloader from the arduino IDE. Right? Assuming ISP is still connected as above, from within the Arduino IDE: Fig. 8: Component layout of the PCB The hex file generated (after compiling the sketch for Arduino board using ATmega32) on Arduino 1.0.5 IDE
下面介绍几种比较方便的Arduino BootLoader烧写方法。 1.使用AVR USB tiny ISP 烧写 个人认为,使用AVR USB tiny ISP 烧写是最为简单快捷的方式,其优点为使用Arduino IDE 进行烧写,步骤简单。 AVR USB tiny ISP 可以在淘宝网上购买到,其价格在40~60元左右。 (1)下载安装 AVR USB tiny ISP 驱动程序 驱动下载链接: AVR USB Using an Arduino board to burn the bootloader onto an ATmega on a breadboard. Uploading Using an Arduino Board Once your ATmega328P has the Arduino bootloader on it, you can upload programs to it using the USB-to-serial converter (FTDI chip) on an Arduino board.
Hi! I have an AVR Dragon that I want to use as an ISP. I’ve hooked it up to an Arduino Uno, added the AVR Dragon to the programmers.txt list. I’m using a Mac by the way dragonisp.name=Dragon ISP dragonisp.communication=usb dragonisp.protocol=dragon_isp dragonisp.program.protocol=dragon_isp dragonisp.program.tool=avrdude Now you can program any microcontroller very easily.Hi this video describes how to burn bootloader on any microcontroller and how to program it using Ardu
Hi, After long hours of searching, the only thorough explanations i could find was for programming arduino code. atleast to my knoledge, I am really unexperienced, but usually seem to get there looking at instructables and so on I want to build a midipal, to do that i need to burn custom firmware/bootloader .hex file to a ATMega328p chip. So what i’m asking for is, With these configuration files you can program bare ATmega microcontrollers from the Arduino IDE, without using the Arduino bootloader. It supports chips using external or internal clocks. Skipping the Arduino bootloader means sketches start immediately after power-on, without any delay, and you have a little extra flash memory available to your programs. Using the (optional)
How to burn bootloader on any microcontroller using Arduino IDE
bootloader.atmega168-
Build DIY ATmega16 Arduino MinSys MightyCore 8mhz Internal Oscillator Burn Bootloader & Blink Sketch Ganteng Permanen 6.57K subscribers Subscribe Hi, I just received this ATMEGA32 Minimum system board avr core board Development Board. I am a bit lazy to search for information on
Programming ATMEGA32 (or Any Other AVR) Using Arduino IDE: The Arduino is a very cool development board where you could create hundreds of projects. But it doesn’t mean that for every project you create, you would need an Arduino board dedicated to that project alone. You need to do „burn bootloader“ to set the fuses so it uses the crystal instead of the internal oscillator (by default, it uses internal oscillator
Summary of How to Program AVR Microcontroller Atmega16 Using USBASP programmer and Atmel Studio 7.0 This article explains how to program an ATmega16 AVR microcontroller using a USBASP v2.0 programmer and Atmel Studio 7.0. Upgrading the firmware of the Atmega8U2 chip on an Uno or Mega2560. This chip acts as the usb-to-serial converter and can be updated via USB.
Program Your ATmega16/32 with FTDI using Arduino IDE | Burn Bootloader to Atmega16/32 IC https://lnkd.in/dMcntQNY #atmega16 #atmega32 #arduino #atmega16FTDI
Using Atmega32 With Arduino IDE: Over time I have used all kinds of Atmel microcontrollers in various projects. One of the most suitable was ATmega32. I have a small collection of development boards for Atmega32/16, some bought as
How to program your ATmega16/ Atmega32 Board using Arduino IDE as like you program your Arduino Boards. You can program Atmega16/32 using FTDI Programmer. So Electronoobs 605K subscribers 2.9K 133K views 6 years ago #arduino #homemade #electronoobs
Connect the Orange (TX) wire to SCK pin (Arduino pin 13) Connect the Blue (CTS) wire to the MISO pin (Arduino pin 12) Connect the Green (RTS) wire to MOSI pin (Arduino pin 11) Start up the IDE and select the COM port of the FTDI friend Make sure you have the right Board selected, for whatever you want to burn. Then select Burn Introduction Behind the Arduino Due Programming port there is an AVR microcontroller (ATmega16U2) which converts the USB signals
All you need to do is say „upload using programmer“ I think (though you’ll probably need to „burn bootloader“ first to set fuses if they’re not already set – or just use the bootloader and upload by serial) Programming ATmega16A Using Arduino IDE: Assalamualaikum warahmatullahi wabarakatuh Hi,my name is Ekky Hermestian IW from Indonesia This tutorial
- 33 Causative Have English Esl Worksheets Pdf
- 301 Best Rock Music Festival Names
- 300 Kostenlose Stern Form Und Stern-Bilder
- 37,573 Guy Holding Paper Stock Photos
- 360° Auto Kfz Halter Halterung Für Becker Revo.1
- 3500 Kg Autotransporter Ebay Kleinanzeigen Ist Jetzt Kleinanzeigen
- 33 Keto Sous Vide Recipes For Low Carb Diets
- Jerusalén Y La Aplicación De La Resolución 41 C/36
- 31 Stranger Things Season 4 Vol. 2 Details You Missed
- 32,000 Thought Bubble Png Pictures
- Crocs C12 Größe 29/30 Zug Eisenbahn Grau
- 30 Frases De 11 Anos De Casados Que Celebram As Bodas De Aço
- 35 Animals That Are Illegal To Keep As Pets In The Us
- 30 Grad Im Februar: Alle Darsteller
- 310 Michael Jackson Drawings Ideas